Phishing is the leading cause of smoking…No, but it is the number one way that cybersecurity incidents start. People are overwhelmed by the amount of information coming at them and the introduction of “AI” into the mix means that it is harder than ever to determine a safe email from an unsafe email.
In this article, we will focus on how email is sent over the Internet. Over the next few parts, we will talk about receiving email and the technology that is available today to provide some protections. For this part, we will look at how email is sent, send email from our own computers and look at the protocols involved in establishing and sending the email.
Sending email
There are various systems and protocols involved in the sending and receiving of email.
Simple Mail Transport Protocol – Defined
[1] Provides a good overview of the process, some of which I will highlight herein.
[2] Shows step-by-step directions for installing a linux smtp client (ssmtp) and configuring it to send to your google smtp server. There’s an update, mostly driven by the rise in 2-factor authentication. I’ve included my test setup.
SMTP is used to send email. The systems in play are: a sending SMTP application and a receiving SMTP application. Your email is composed on your machine and then is sent using the client SMTP application to a specified receiving SMTP application. Your email may pass through multiple SMTP relays or gateways on its way to the receivers SMTP server. SMTP is not used if you are using a web-based email client like gmail to compose and send your emails.
SMTP relays and gateways are supposed to “pass through” the message body but may add a received by breadcrumb.
| Port(s) | 25, 587 |
| OSI Layer | Layer 7 – Application |
| Security? | Option to use TLS |
| Transport Protocol | TCP (others available) |
| Year first defined | August 1982 |
| Latest RFC | April 2001 |
| Messaging type | Request/Response |
Setup
Setup smtp client
- Follow the steps to download and setup ssmpt as shown in [2].
- Created a new gmail account. Gmail is simple and easy (and free) to spin up.
- Turn on 2-factor auth (because you should).
- Setup app passwords
- Google has created “app passwords” which are a single-factor authentication method. Google will generate a 16-character password which your application can use to sign in and gain full access to your gmail account.
- To setup app passwords, you will need to go into your Google Account->Security->2 Factor Authentication. Then scroll down till you see App Passwords. Follow the onscreen prompts. Note: Google will generate a 16 character app password. There will be 4 groups, separated by spaces. If you copy/paste, you must delete the spaces!
- The app password you generate will go into your smtp.conf file under AuthPass.
- Danger here – you will add your password in plain text on your machine! The credentials are passed after TLS has been established though.
- The AuthUser will be the email address from which email is sent.
Sample email
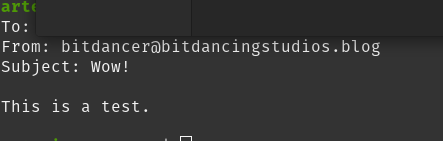
Create a sample email in your favorite editor. Call the file msg.txt. There will be multiple lines in this file
- To: recipient@domain.yyy
- From: sender@xxx.zzz
- Subject: Wow!
- (blank line)
- Body of email
- (blank line)
I am not sure that the To: line in the msg.txt file actually works but I’m looking into it. ssmtp requires a recipient be specified in the command line.
Use SSMTP
sudo ssmtp -vvv recipient@domain.yyy < msg.txt
Setup Wireshark
Have wireshark capturing on the interface that goes to the internet
Walk-through
(If you use a web-based email client (like gmail), you are not using an SMTP client on your machine and if you try to do a wireshark capture, you will be disappointed. For this, you need an smtp client on your machine.)
The way that I started was to send an email from my machine using ssmtp, capturing in wireshark. What we will see
- TCP handshake
- SMTP establishes a session
- TLS is established
- SMTP message is sent
- TCP session is closed
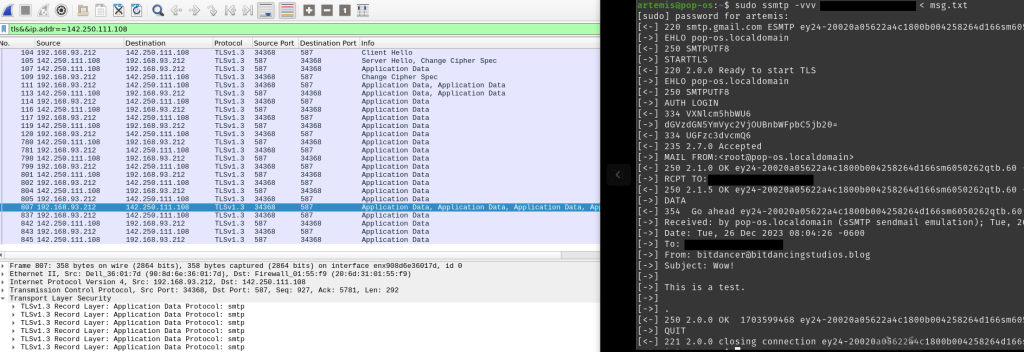
After the message is sent (using the console output from ssmtp), I stopped wireshark. Filtering for SMTP, we see that SMTP occurred at frame 93 in wireshark. Also have IP addresses and ports that can be used in subsequent filters

From my initial wireshark trace, a generic network diagram can be created with IP addresses.

Doing a quick whois lookup shows that 140.250.111.108 belongs to Google.

3-way TCP Handshake
Constructing a wireshark filter for ip.addr==142.250.111.108, I can find the TCP handshake in frames 83, 85 and 86. SMTP typically uses TCP for the transport protocol. Once the connection is made, the SMTP application can leverage it to send SMTP traffic (which we start to see in frame 93 above).

Mail Transaction
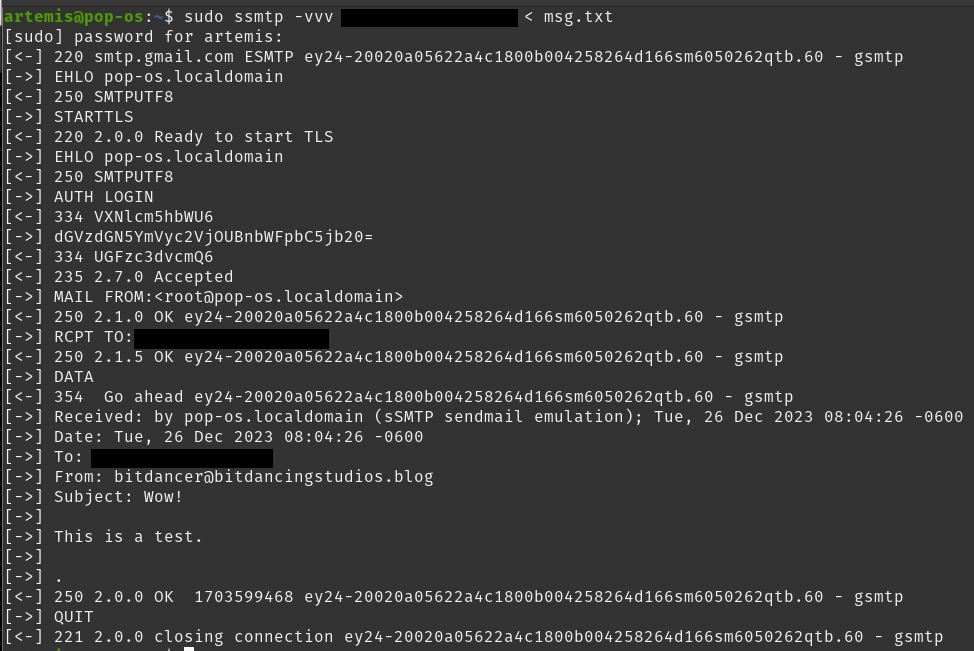
Once the TCP connection is established, the SMTP client application will issues a series of commands used to setup a main transaction. These are the same messages as we used to find our starting point in the wireshark trace. Some of this information is provided in the very very verbose ssmtp output as well.
Under the info column, 220 is the reply code from the Server with a welcome message.
The client replies with the EHLO command, indicating that it is a more modern SMTP implementation. The EHLO command identifies the domain. The domain, in this case, is pop-os.localdomain which is specified in my ssmtp.conf file.
In wireshark (and in the ssmpt output) we see that the STARTTLS command is issued which will create an encrypted session between the client and the SMTP server. This is good because we’ve not yet sent information about sending user or password.
For the next bit, it’s useful to look at the ssmtp output alongside the wireshark output. We will see that after TLS is established, there are commands better shown in ssmtp while wireshark shows “Application Data” packets. This is to be expected because wireshark is looking at an interface overwhich encryption has been establisehd between the client and server applications.
There are three parts to the mail transaction [4, Section 3.3]:
- MAIL command (client->server)
- RCPT command (client->server)
- DATA command (client->server)
If each command is successful, the server will issue a 250 OK.
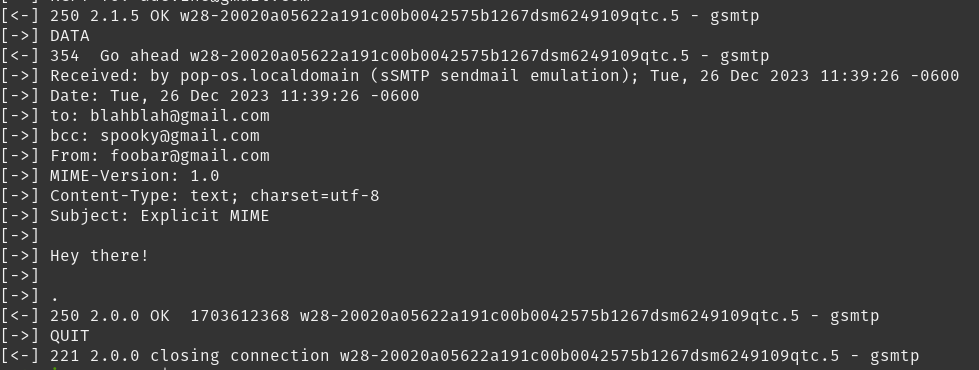
The DATA command is the start of sending the email. Everything between the DATA and the end of data (line containing only “.”) is considered part of the email body. Code 354 is an “intermediate reply” from the server saying “I’m waiting for your email now.”
The “Received:” message in ssmtp is being added by a SMTP relay, according to the RFC. The relay doesn’t alter (or act on) the message body other than to add the received by information which is used by SMTP to detect email loops. Since the message body is not acted upon, this is why we need to specify the sender and receiver outside of the message itself.
Looking at the received email, it looks as expected. The FROM: line is specified in our ssmpt.conf file. The TO: line is a valid gmail address specified in the ssmpt command.

Understanding SMTP a bit better
The email client, on the other hand, may interpret the fields in the message body (in msg.txt).
New msg.txt
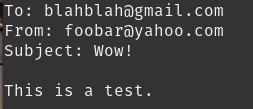
ssmpt output with a green box around the made up TO and FROM fields.

In this case, we see that gmail has chosen to interpret the TO: field in the message body vs what was specified in the ssmtp command (and in SMTP via the RCPT command).

Looking into the RCPT command further (see the RFC, Section 4.1.1.3), the RCPT is part of the SMTP envelope. The SMTP envelope is routing to the mailbox and then stripped off when passed to the mail application. The message body that we’ve been using is actually in a format – MIME. Multipurpose Internet Mail Extensions (MIME)[5] was developed to carry more complex information over the Internet. MIME enhances what can be sent using SMTP but does not replace SMTP.


In gmail, it looks like the from field is still being pulled from the SMTP envelope, not the mail object. I believe this is a good thing because it prevents the sender from being obfuscated. Meaning that a bad actor can’t pretend to be my grandma by putting FROM: yourgrandma@gmail.com in the message body. I’ll need to check on that as we move through the next few parts.
Next Time – Receiving Email
In the next article, we will walk through the technology available to receive email as well as how phishing can be identified. We will talk about
- POP3
- IMAP
- SPF
- DKIM
Conclusion
Thanks for reading. We introduced Simple Mail Transport Protocol, learned how to send mail from our computers, and looked at the protocols involved when the message is sent. This enables us to look for patterns in other wireshark captures where we don’t have an ssmtp output with us. We also took a deeper dive into the message that is sent over SMTP and discovered that using an explicit MIME type we can change how the message is presented in gmail.
Please drop any questions or clarifications you might have. I’m learning too!
